Joybilee Farm Whole Wheat Bagels
The word “Bagel” entered the English language from Yiddish. Bagels are distinctive, ring-shaped, bread with a firm, chewy texture that comes from first boiling the bun and then baking it. What passes as bagels today are just ordinary buns or rolls that have the typical doughnut shape, but with the bun-like texture of regular baked breads. True bagels are difficult to come by these days, unless you have a Bagel bakery in your neighbourhood, a Kosher deli, or you make them yourself at home.
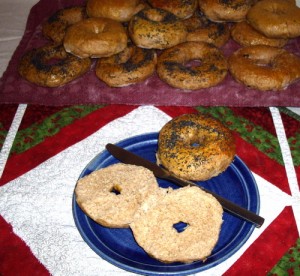
Chewy, delicious whole wheat bagels
When I grew up in Vancouver, BC, I rode the street car for an hour to get to Granville Island, where the best Bagels in town were made. You could watch them being made, while you stood at the counter and chose one of the many varieties and flavours – pumpernickel rye, blueberry, poppy seed, whole wheat, multi-grain, and many more. Then you could order them plain, toasted, or with lox and cream cheese for a quick lunch. Fast food in those days meant deli food.
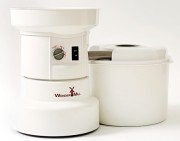
I created this recipe for the Wondermill Grain mill Wagon Challenge to evoke those bagels that were my favourite fast lunch from long ago. You can eat them warm from the oven with butter and cream cheese and if you are daring, pair them with BC smoked salmon, and Zinfandel wine from the Okanagan Valley.
The Secret
The secret to chewy, delicious whole wheat bagels is 3 fold.
- Use hard red winter wheat berries that are high in protein and gluten for the best texture in the finished bagel.
- Wait till the water in your pan is just at boiling before inserting the bagels into the water for boiling. Too hard and the bagels will fall apart and too cool and the bagels won’t gain their oomph to rise up in the boiling water.
- And finally use a flavourful local honey to add its sweet, complex flavour to the finished bagel.
Yield 12 bagels
Ingredients:
4 cups hard red winter wheat berries, freshly ground on pastry setting
½ cup rye berries, freshly ground on pastry setting
¾ cup warm water
1 tbsp. active dry yeast
3 tbsp honey
2 tbsp virgin olive oil
2 large eggs
1 ½ tsp. sea salt or Himalayan pink salt
For boiling and for glaze
2 quarts water, boiling
1 ½ tbsp. sugar
1 large egg, beaten with a pinch of salt
2 tbsp. poppy seeds
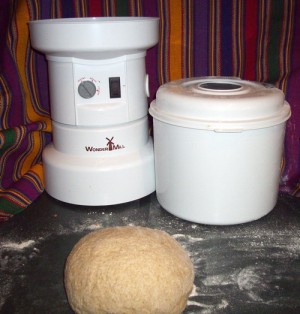
When choosing wheat berries for bread or bagel making use hard red winter wheat. It is higher in protein and even whole wheat bread made from it is lighter in texture. Bagels made from it are lighter and chewier.
Method
The flour comes out of the Wondermill Grain Mill well sifted with lots of air. It’s best if you grind it as needed, for this recipe. If you need to grind it ahead, refrigerate it to keep the freshly ground flour as fresh as possible. 4 cups of hard red winter wheat will give you 6 cups of whole wheat flour. You will use 4 to 5 in this recipe, depending on the humidity where you are.
Put warm water in a 1 cup glass measuring cup. Add 3 tbsp. of honey and stir until the honey is melted and well mixed with the warm water. Stir in 1 tbsp. of yeast. Set aside. Yeast mixture should bubble and foam in about 15 minutes. If it does not the yeast is dead and you should discard it and try again with fresh yeast.
In a large mixing bowl, add 2 cups of whole wheat flour, salt. Mix with dough hook in an electric stand mixer, or by hand. Make a well in the centre and drop in the eggs, 1 at a time, beating after each addition. Add olive oil. Beat until a ball begins to form. Add 1 cup of whole wheat flour and continue beating. Add ½ cup rye flour and continue beating. Dough should form a soft ball and pull away from the sides of the bowl. Add the final cup of whole wheat flour a little at a time, mixing well after each addition. If you are doing this on a humid day, you will need the whole cup but if you are mixing in a drier area you may not need it all. Only use the amount of flour necessary to form dough that is not sticky and can be kneaded until smooth and elastic. Once all the necessary flour has been added, turn out on floured counter top and knead until smooth and elastic.
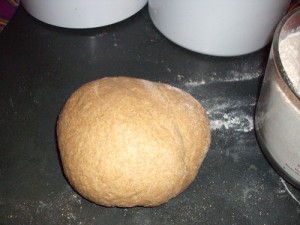
After mixing the dough in the stand mixer until it is smooth and elastic, the dough kneaded by hand to complete to kneading process.
Place in a clean mixing bowl, cover with plastic wrap or a damp towel and put it in a warm, dry place to rise.
Allow to rise for 1 ½ hours until lighter but not doubled in bulk.
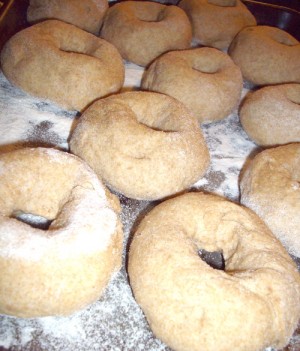
After shaping by hand, bagels are allowed to rise for 15 minutes, covered in a towel.
Shape into Bagels
Punch dough down and knead lightly. Divide dough into 12 equal portions. Roll each portion into a smooth, spherical ball between your palms. Make the ball as firm and smooth as possible. Finish each ball by rolling it on the counter top under your hand in all directions. This will make it firm and smooth. To make the hole in the middle of the bagel, flatten the ball slightly. Insert your floured index finger through the centre of the ball. Twirl your finger into the centre of the ball of dough to stretch the hole bigger. When it is large enough, insert two fingers and continue rolling the hole larger, until you have a hole about 1 ½ inches in diameter, in the centre of the bagel. Correct any unevenness in the shape of the bagel. Flour a baking sheet with coarsely ground rice or corn flour. Place shaped bagels on the baking sheet. And continue to shape each round of dough until all 12 bagels are on the floured baking sheet. Cover and let rise for 15 minutes. If holes close during rising time, gently open them again with your fingers.
Boil bagels:
Meanwhile, bring 2 litres/quarts of water to a boil in a large pan, to which you have added 1 ½ tbsp. of sugar. Add bagels 3 or 4 at a time and boil for 1 minute. Turn them over in the boiling water and boil for 1 minute longer. Bagels will puff up in the boiling water. With a slotted spoon transfer boiled bagels to a pan lined with several kitchen towels, to drain. Repeat with remaining bagels.
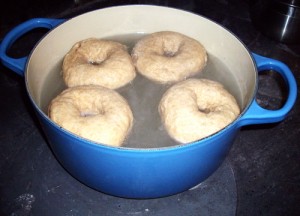
Put bagels in a pan of just boiling water and boil for 1 minute on each side before draining.
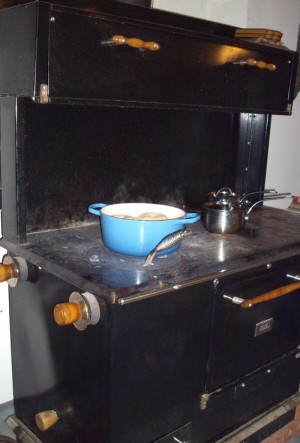
Winter cooking on the Pioneer Maid Woodstove. Boiling Wholewheat bagels, prior to baking.
Bake the bagels:
Once the bagels have drained so that they are no longer dripping, put bagels on a baking sheet that is lightly floured with rice flour or corn meal, bottom side down. Brush the tops of the bagels lightly with beaten egg glaze, sprinkle with poppy seeds. Preheat oven to 400F. Bake bagels for 20 minutes until golden brown.
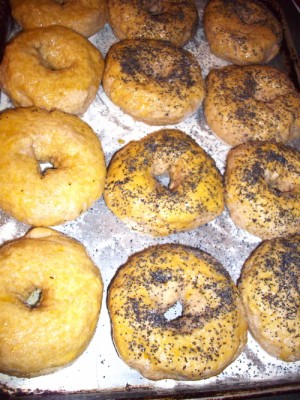
Glaze the bagels with beaten egg and sprinkle with poppy seeds before baking.
Cool on a rack, and serve while still warm. They will stay fresh for 2 days at room temperature or freeze them for longer keeping and reheat them or toast them before serving.
Joybilee Farm teaches self-sufficient skills for backyard homesteading, including how to bake bread from scratch. Bagels are my all time favourite breakfast bread.