

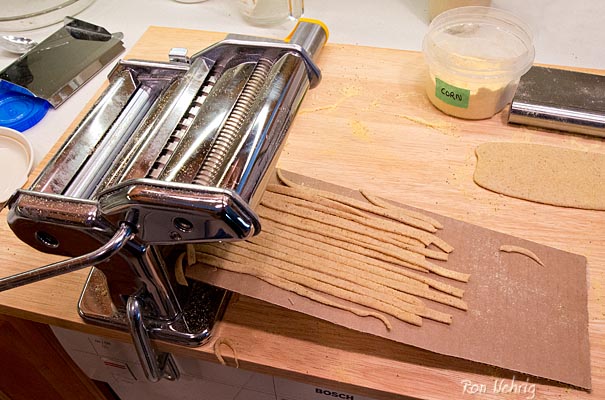
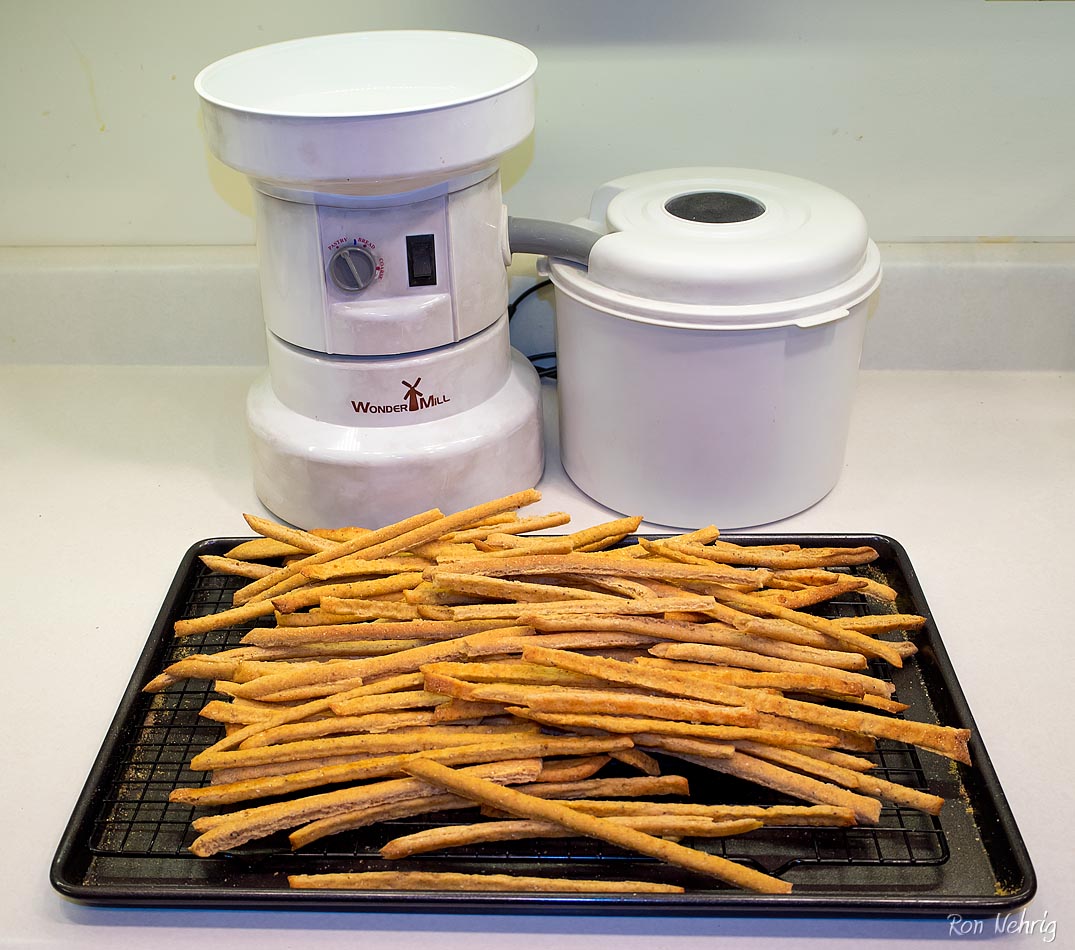
Grissini cut with a Pasta Machine
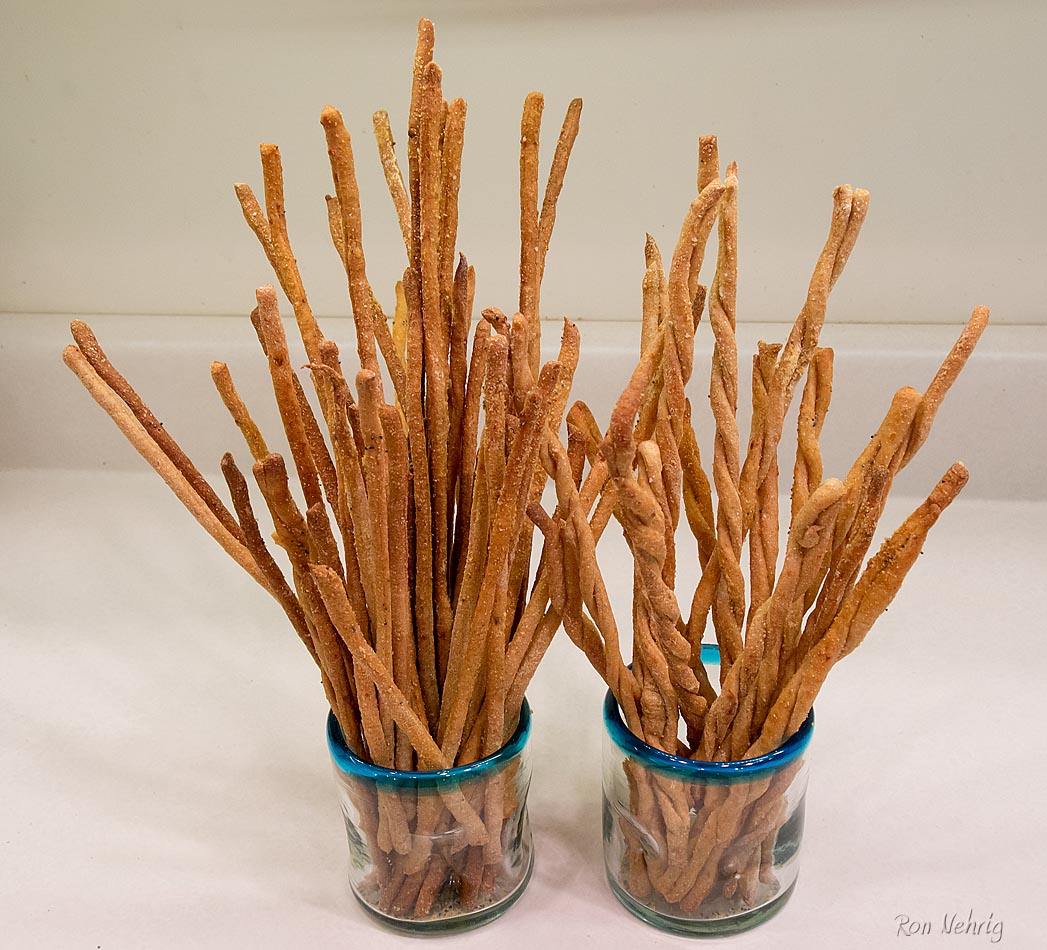
Ron’s Grissini Sopresa are thin, whole grain Italian Bread sticks, perfect for snacking at home, parties or while visiting with friends. They’re crisp and crunchy, with a lot of flavor that can vary with what is put in them, and because they’re well dried, they last a long time…well, if they’re not quickly eaten.
They can be rolled with a pasta machine roller or a rolling pin, and cut with a pasta machine Fettucini (or wider) cutter or cut wider with a pizza cutter or homemade device like the one pictured below.
Grissini cut with with homemade Pizza cutter
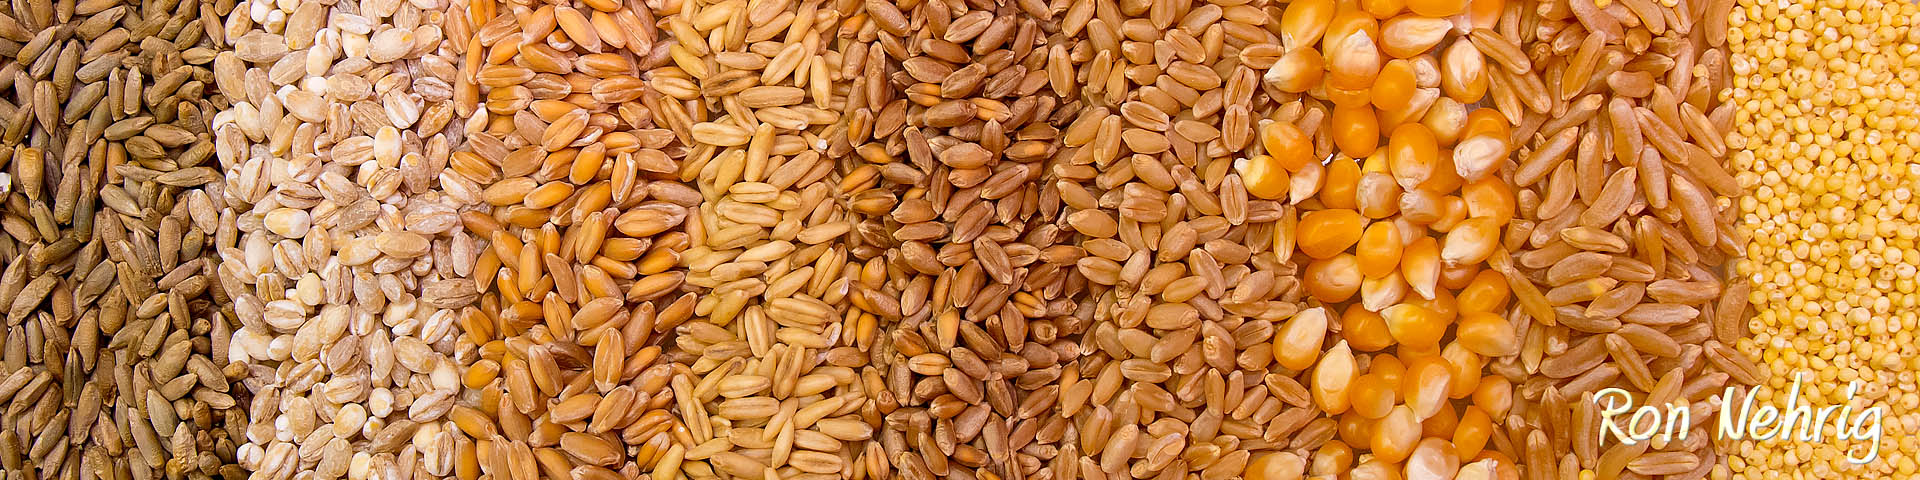
My Grissini are 100% home-milled grains, which is all I ever use, and these are Sourdough, Hard White Wheat, Hard Red Wheat, Khorasan Wheat, Durum Wheat, Corn, and Rye, with some Parmesan, a couple pinches of Oregano, and spices added later as I roll the dough. I use Corn flour to dust the dough to prevent sticking while rolling and cutting. Since I made this recipe up using one of my pizza dough recipes to start, you may substitute other grains, though if you replace much of the wheat with non-gluten grains, you may need to add some Vital Wheat Gluten. I seldom use the same blend of grains in any bread I make, so have fun with it–the recipe is only a guideline and starting point.
 Why do I use so many grains? Each grain has its own character and flavor, and they blend together to make a full, rich, complex taste. It’s easy to weigh the grains I want and mill them all together, and since I mill them all right before using them I know they are as fresh as they will ever be. I consider flour to be the same as any other fresh produce–once it’s picked, or milled in the case of grains, it is the best it will ever be, after that it is all downhill.
I try to keep track of measurements by volume, but I use weight, so if you use the volume measurements be a bit careful when adding flour. This is a single batch, a good place to start experimenting. I have since doubled this for my usual batch size.
I milled all of these grains around the Pastry setting on the WonderMill, except for the Corn, which doesn’t feed well at that setting, so I turn it up until it feeds. The corn can be dried flour corn, dried sweet corn, or popcorn. I used a mix of dried sweet corn and popcorn because that’s what I grew last year.
If you don’t use Sourdough starter, add 10g of water and 10g of flour to make up for not using it.
White, Red, Khorasan, Durum, Corn, and Rye Grissini
| > > | 20 g | Starter |
| 0.75 tsp | Yeast | |
| 0.75 C | 175 g | Water |
| 0.5 Tb | 6.5 g | Sugar |
| 0.75 tsp | 5 g | Salt |
| 1 Tb | 14 g | Olive Oil – Carapelli |
| 0.75 C | 92 g | Hard White Wheat |
| 0.5 C | 60 g | Hard Red Wheat |
| 0.25 C | 30 g | Khorasan |
| 0.25 C | 30 g | Durum |
| 0.2 C | 20 g | Rye |
| > > | 14 g | Parmesan |
| 2.00 | pinches | Oregano |
And about 3/4 Cup of finely milled Corn Flour/meal for dusting the dough to reduce sticking while rolling and cutting.
Some other flavor ideas:
Since small chunks of dough are cut from the larger mass to roll and cut Grissini and Pasta, each chunk can have individual flavors worked in as it is shaped and rolled; some that I’ve used are Poppy Seeds, ground or whole Sesame Seeds, Hungarian Paprika, smoked Paprika, Chili Powder, Ancho Pepper powder, Chipotle Pepper powder, fresh pressed Garlic, or other spices. This allows experimentation on only a small bit of dough, and creates variety in a pile of Grissini, creating Grissini Sopresa (breadstick surprise). I have ground Sesame seeds in my spice grinder for the small Grissini, but I use them whole in the larger Grissini; it might be nice to lightly toast the Sesame seeds to develop more flavor.
Assembling the Dough
I used a Poolish of 100g water, 75g flour (taken from the above list of ingredients), the sourdough starter and about 1/8 tsp of yeast. I let that sit for about 2 hours in my warm proofing bin. This step isn’t necessary, but does develop more flavor and gives the sourdough time to develop. Because I sift out the bran and re-mill it, I add this bran to the poolish, together with enough flour to make up the total weight, figuring the bran will have extra time to hydrate and soften; I also do this for bread.
Roughly mix the main ingredients like a batch of bread, leaving out some of the White Wheat flour to make adjustments later, though for me it usually takes it all, and may take a bit more.
Let the dough rest and hydrate for about 20 minutes, then continue mixing/kneading, adding flour until it is no longer sticky. I use my 4.5 qt Kitchen Aid for this small batch, even for a double batch; it’s a bit small for the 7 qt mixer. I only let the mixer knead for a few minutes after all of the flour is in; my feeling is that whole grain dough is a bit more fragile. I then turn it out on a work surface and finish kneading by hand to get a feel for the dough and form a good surface. We don’t want a sticky dough, since that would get stuck in the pasta machine, but it won’t be as stiff as pasta dough; just make a nice smooth dough ball; we’ll be dusting the dough with Corn flour as it gets prepared to go in the pasta machine so it doesn’t have to be perfect.
Put the dough in an oiled bowl, covered, and let rise until doubled. If you’re in the mood give it a stretch and fold during this period.
I cut off a small chunk of dough after about 20 minutes to try making some Grissini in the Pasta Machine.
Rolling
Press the small dough piece out by hand until it is 1/2 inch thick or so; if you’re adding poppy seeds or spices do that now. Then fold in half, with the spices to the inside, fold in half again and again, and press flat until it is 1/2 inch thick or so. Lightly, but thoroughly, coat both sides with Corn flour to keep it from sticking to the rollers, and run it through the rollers at the widest setting. Fold that in half, lightly dust both sides with Corn flour and roll again. All of these folds are helping to incorporate the spices and to make the Grissini more tender. The layers are especially noticeable in wide Grissini, where they may separate and form an air pocket inside.
Use a piece of cardboard to catch the Grissini
Cutting with the Pasta Machine (also see cutting by hand)
Lightly, but thoroughly, coat both sides of the rolled dough with Corn flour and run it through the Fettuchini cutter, carefully guiding the Grissini out so it doesn’t pile up and get tangled.
Grissini are more delicate and stretchy than noodles and a cardboard catcher, shown to the right, makes handling them much easier. Try using a piece of cardboard narrow enough to fit under the pasta rollers, dusted with flour or corn flour, to catch Grissini (or pasta) as it comes out of the cutter. Start to feed the dough into the cutter, slide the cardboard all the way in, then slowly pull it back as the Grissini or Pasta comes out of the cutter and settles on the cardboard; it is then easy to slide off onto a baking sheet.
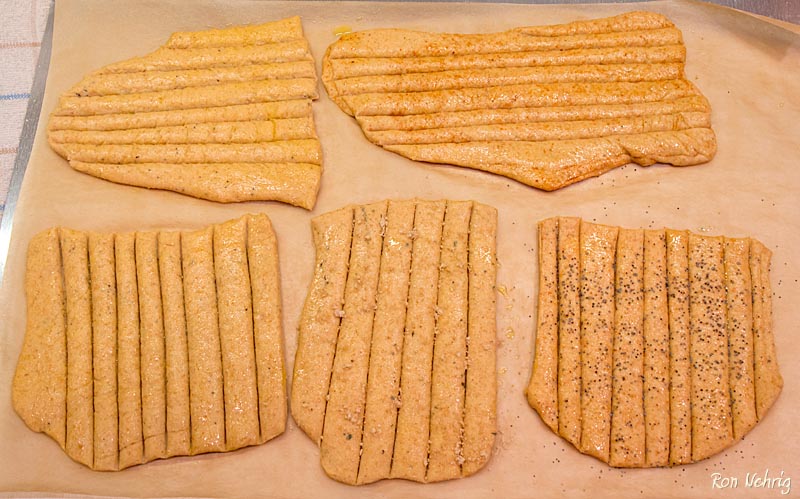
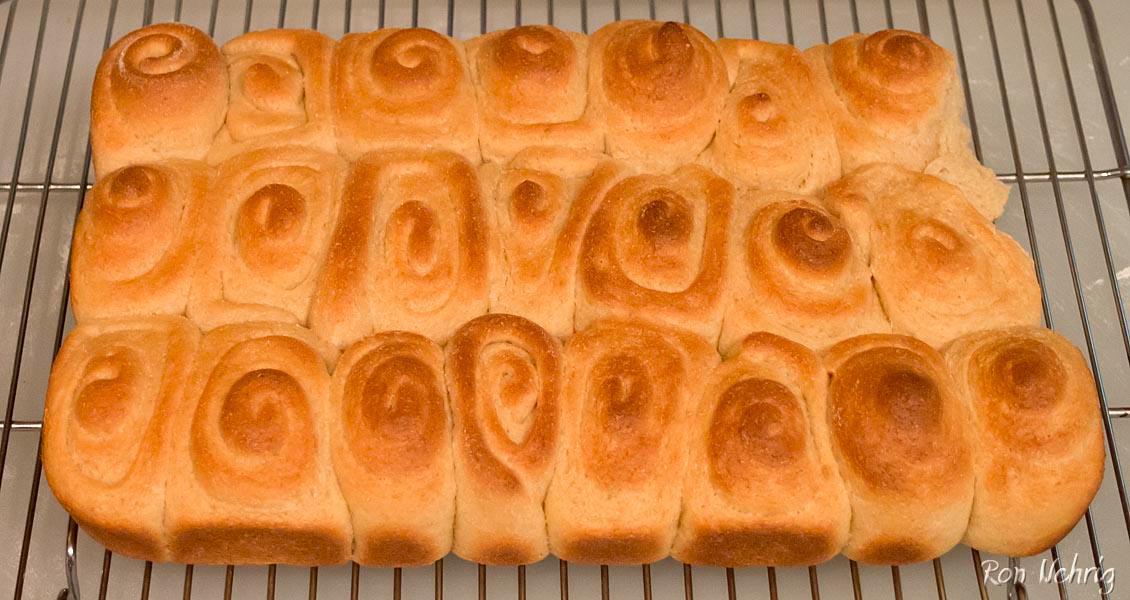
Carefully lay them out on a baking pan lined with parchment or reusable cookie sheet liner, separating each with a small space. I let them sit in my proofing bin for 15-30 minutes, but it becomes awkward as sheets of Grissini start piling up, so I have to start baking them no matter what. Before baking brush the batch lightly with Olive oil, sprinkle on some ground Kosher salt or canning salt, and put them in the pre-heated oven at 350°F for about 12 minutes; check them, turn them over if one side is browning more than the other, and bake them another three minutes or so. The double twists shown in the top picture took a few minutes more; I’ve since decided I prefer the single strands for their delicate crunch.
Grissini cut with Pizza cutter, brushed with Olive oil, sprinkled with salt, some with Poppy seeds
Cutting by Hand
The pasta machine makes thin delicate Grissini, but separating them on the baking sheets is rather tedious and takes a lot of sheets, so I’ve experimented with cutting them wider by hand.
Roll the dough into sheets as before, but place them directly on the parchment paper lined baking sheet, and allow to rise for 10 or 15 minutes, then dust the surface with corn flour and cut with a pizza cutter. I like them around 3/8″, but that is pretty narrow for a single cutter, so 1/2″ and even wider worked okay. The wider ones became more like crackers, and are good for thicker dips like Artichoke/Chard Dip. Allow them to rise for another 10 or 15 minutes, or whatever looks right to you, then brush with Olive Oil and sprinkle with salt; I use canning salt because it is fine and has no additives. I find Kosher salt to be a bit coarse for such small bread sticks, but you might want to try some to see what you think.
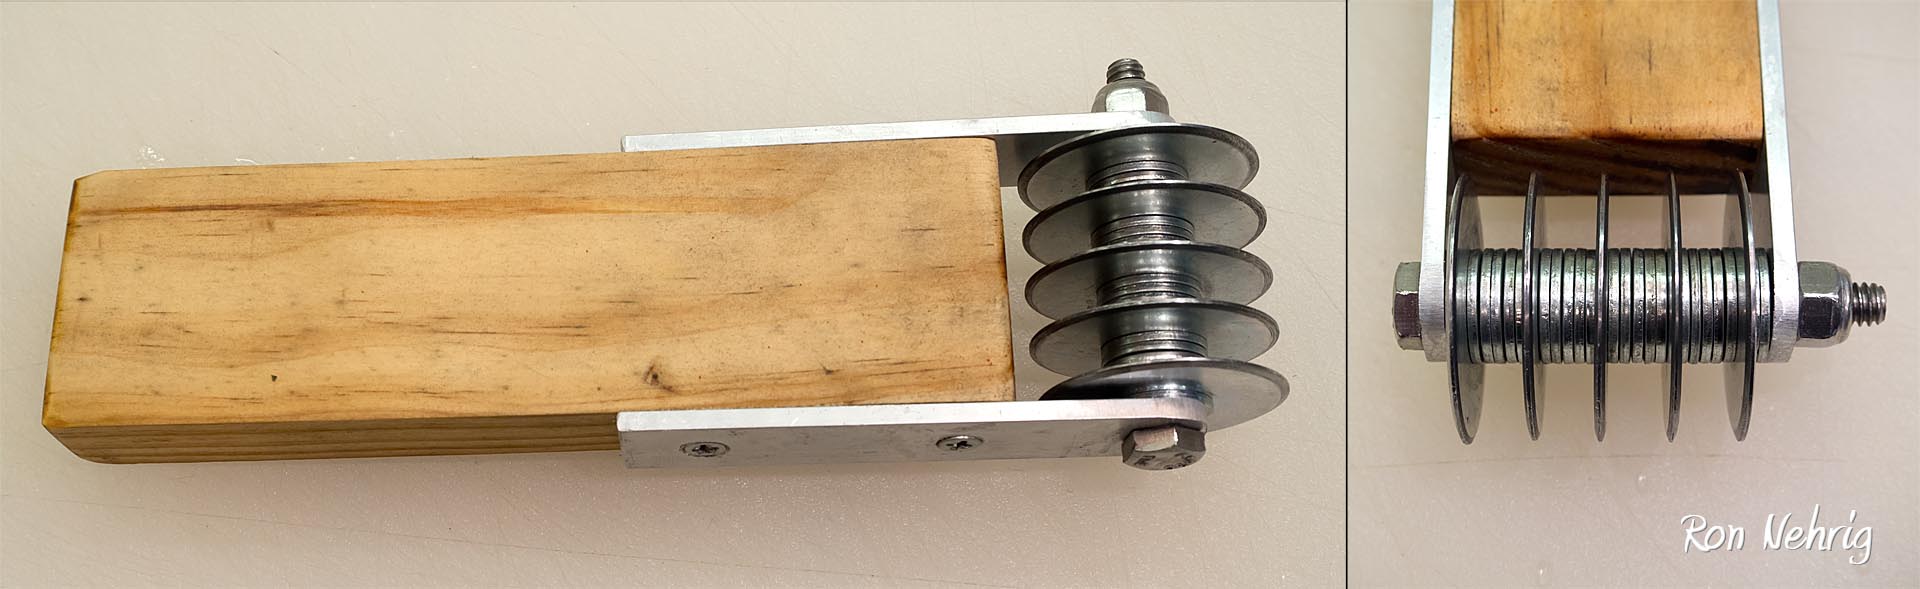
- Grissini cut with five blade cutter
Baking
The thin Grissini, cut with the pasta machine, brown quicker, so I used 350°F, but the wider ones seem to like a higher temperature to brown, 375°F to 390°F. In the end we want them dry and crunchy but not too brown. If they are brown enough to remove from the oven, but are still not crunchy enough after cooling, return them to a 150°F oven for 15 minutes or so to dry them out more. My first batch of thin Grissini was perfect without this step, but my second batch needed it, and the larger ones usually do.
I put a reusable Silica Gel Container in the bag with the Grissini to help keep them crisp.
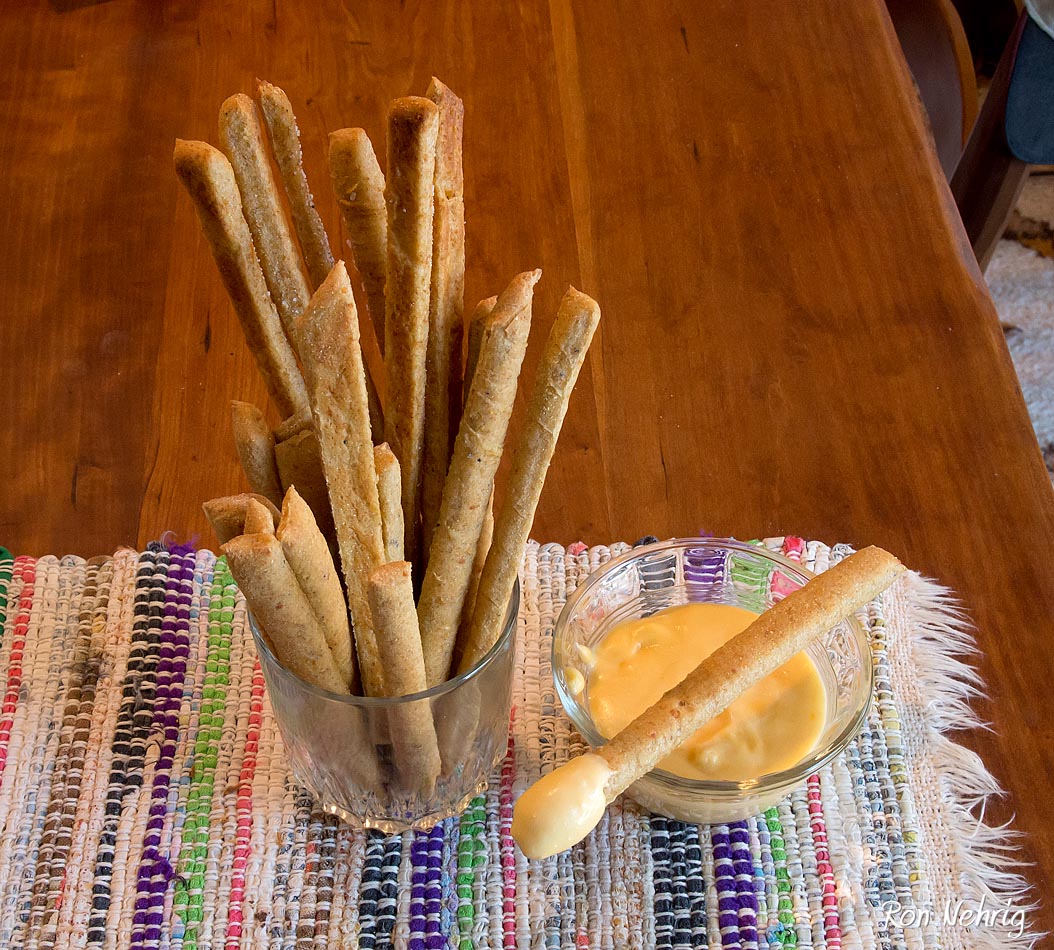
These are great by themselves, but very nice with cheese dip, a thick tomato sauce, or ?
The new Grissini cutter.

Cut with the Grissini cutter
While using the single blade cutter I was thinking, “it would be nice if there were more cutters,” so I made one. I now roll the dough into sheets with a pasta machine, let them rise while I roll the whole batch, then brush them with oil (hoping it will keep them from merging together), cut them, and let them rise a bit more. I don’t separate them so they require fewer baking sheets, but it does require breaking them apart after baking, maybe even running a single blade cutter over to break them free. They might break better if I completely dried them first; I’m still experimenting with this technique. The cutter is currently set at 3/8”, but if I want to change the width I can take it apart and add or remove small washers.


2 Responses to Grissini – Italian Breadsticks